Art is one of my favourite ways to style a space. What I love even more, is that it is super easy to DIY – even if you have limited skills. This project is the perfect way to explore your creative flair. And as you will discover textured artwork is very satisfying to make!
It is also perfect if you are on a budget too. Our finished design looks high-end but only costs a few dollars. You can pick up a blank canvas from a craft-store or you can even re-purpose a second-hand artwork. As we will be using a thick multi-joint compound, you can cover up an existing design and give an old canvas new life.
The best thing about this project is that anything goes - you can just keep working on it until you like the way it looks. It’s so easy to fix too, so if it is not coming together you simply flatten it out and try again. Using the right frame is important to give your artwork a professional finish. This is much easier than it sounds, and really elevates the overall look.
Either as a single artwork or a collection, these affordable pieces are a fabulous way to dress any blank wall by adding warmth and texture.
So, let’s get started!
What you need
To create the two DIY artworks, you will need:
- canvas
- a multi-joint compound or pre made plaster
- adhesive spreaders with a smooth edge
- adhesive spreader with notched edge
- paint brush
- coloured paint
- 4 x thin pieces of wood for each canvas
Approximate time (excluding drying time): 1 hour
Difficulty: ★★☆☆☆
The project step by step
Step #1
Apply the multi-joint compound all over your canvas. You can do this a number of ways – so have fun experimenting. For my first design, I went for an abstract random pattern. I took the scraper and applied the compound in downwards strokes.
Step #2
You can leave it like that to dry for a neutral look. Or you can add some colour. I added some different shades of soft grey to my finished work.
Step #3
For my next piece, I used a straight edged adhesive spreader to create some patterns all over the canvas.
Step #4
Using another adhesive spreader with a serrated edge (a 4mm V Notch), I added some different shapes to my artwork.
Step #5
Again, if you are looking for a neutral look, simply leave it to dry overnight. Or if you’d like to add some colour, wait until it dries and paint the bolder lines and texture. I’ve added a soft beige to my piece.
Step #6
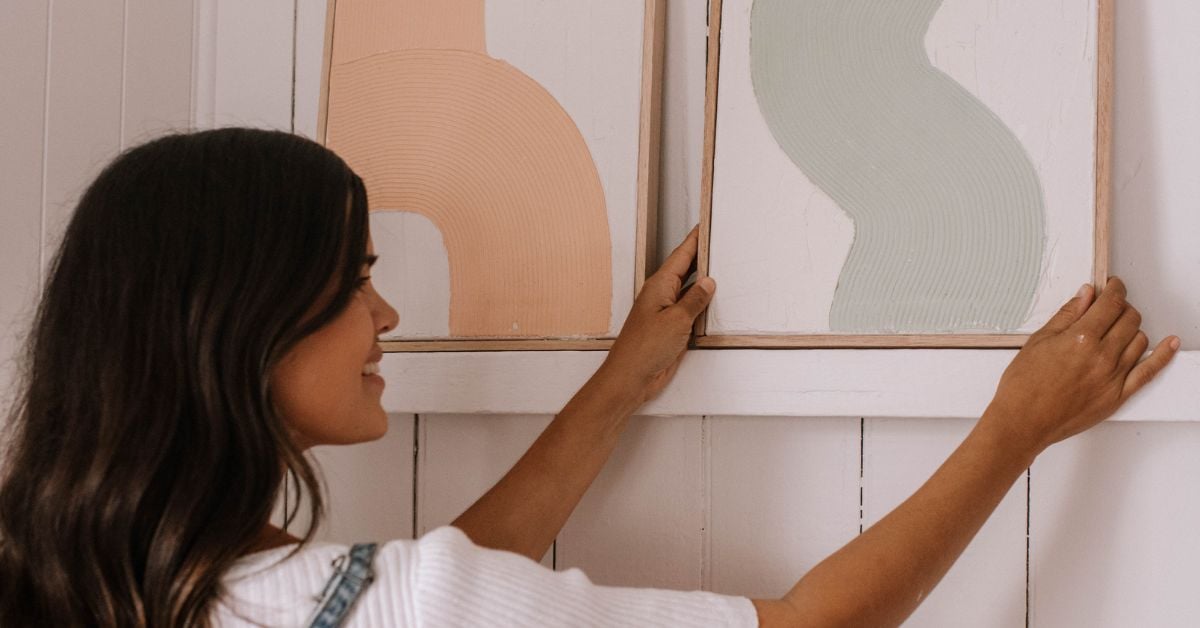
The final step is to frame your art – it really elevates it to another look. I used four pieces of thin wood. Adhere to the canvas using a hot glue gun. Overlap the wood around the edges as you go around. You can mitre the edge if you’d like – but I found leaving them untouched to be quite simple and effective.
Step #7
Time to hang up your art pieces. These look so good and also work in an extra-large format. They are the ideal focal point for my space!
You can see this project’s step-by-step here. And for more inspiration, DIY projects and styling tips, don't forget to follow our Instagram account!
DISCLAIMER - The information provided is for guidance and informational purposes only and does not replace independent business, legal and financial advice which we strongly recommend. Whilst the information is considered true and correct at the date of publication, changes in circumstances after the time of publication may impact the accuracy of the information provided. LJ Hooker will not accept responsibility or liability for any reliance on the blog information, including but not limited to the accuracy, currency or completeness of any information or links.