It may sound tricky, but reupholstering furniture can be a very fun upcycling project. What I love about it is that you can take a really basic piece and completely transform it. And this is exactly what we are going to do today with a dining chair.
I found the chair used for this project in a second-hand store. It has a great shape, but I am not a fan of the fabric. Luckily, dining chairs are generally relatively easy to reupholster.
So let's get started!
What you need
To reupholster your dining chair, you will need:
- A dining chair with a fabric seat (check that it can be removed)
- Replacement fabric (I'll be using a boucle)
- A piece of non-woven fabric
- Scissors
- A screwdriver
- A staple gun
Approximate time: 1.5 hours
Difficulty: ★★★☆☆
The project step by step
Step #1
Remove the seat cushion from the chair. Next, turn the chair over and remove the screws that keep the cushion in place. They can be a little hard to budge, but the seat cushion should come away easily once they start to loosen.
Step #2
Once it is off, check whether the foam and the cover need to be replaced entirely or whether you can upholster over the top. Fortunately, mine is in good condition!
Step #3
Place your seat cushion on top of your fabric and start cutting. You'll need to allow for a perimeter of at least 10cm to go over the edge of the seat base to be attached.
Step #4
Time to start stapling. The most important part of upholstering is to make sure the tension is correct. Start by putting one staple on all four sides. This will ensure the fabric won't be too loose.
Step #5
Using the staple gun, secure along each side, but leave the corners for now. Make sure that you are pulling the fabric tight enough that it compresses the seat's foam. This is even more important if you have had to replace or add new foam batting and fabric.
Step #6
Tacking the corners is hard, so it pays to go slowly. I'm using stretchy boucle fabric, which makes it much easier. Take the leftover material in the corner and fold it into a point. Press it down and secure it with staples.
Step #7
To make the finish look a little more professional, I like to take a non-woven fabric and use it to cover the underside of the cushion. Simply cut to size and staple it neatly to the bottom.
Choosing a non-woven fabric means you don't need to fold over the edges of the cover. It gives a clean look that won't fray.
Step #8
Before reattaching the seat cushion, wipe down the frame of the chair with a rag to remove any dirt or dust. If you also wish to paint it, now is a good time to do it.
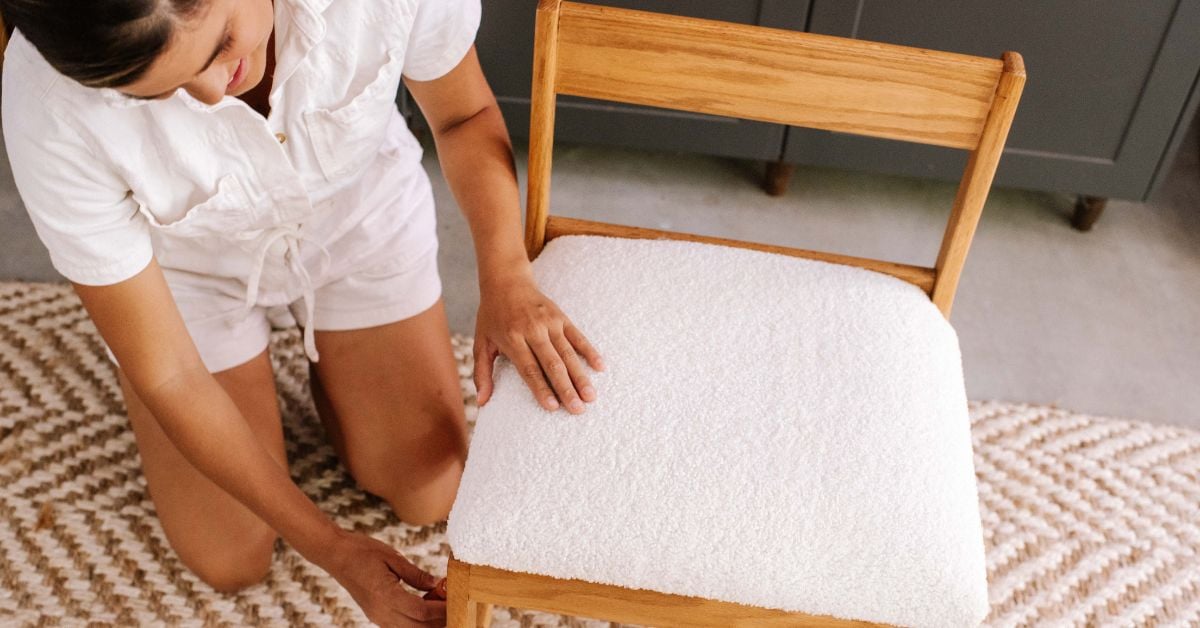
Step #9
It is always such a good feeling to place the newly upholstered cushion down and see how much better it looks! Use your screwdriver to secure it in place. Once you've done all sides, your new dining chair is ready to use. It looks so professional, even though you did it yourself!
Step #10
Your upcycled chair needs a special place. Pop it in your bedroom room or use it in your dining or lounge area.
Reupholstering is a great way to keep old furniture from being thrown into the skip bin. I love this one so much, and it was so easy to do.
You can see the video of this project’s step-by-step here. And for more inspiration, DIY projects and styling tips, don't forget to follow our Instagram account!
DISCLAIMER - The information provided is for guidance and informational purposes only and does not replace independent business, legal and financial advice which we strongly recommend. Whilst the information is considered true and correct at the date of publication, changes in circumstances after the time of publication may impact the accuracy of the information provided. LJ Hooker will not accept responsibility or liability for any reliance on the blog information, including but not limited to, the accuracy, currency or completeness of any information or links.